Fishing Reel Cleaning

I bought this Abu Garcia fishing reel at a yardsale for like three bucks. When I got it, it was kinda dirty and it had some issues with it. It would go into cast mode okay, but when I spun the reel it wouldn’t kick back into reel mode. The reel handles just spun freely. After spinning the reel handles for a while it would finally ‘catch’ on something and kick back in to reel mode. It was also hard to push the cast button at times. So I knew it would need some work and that’s why I bought it. I wanted to fix it and learn how it worked inside….and because it looked cool 😛


So I’m not going to go into great details of disassembly and reassembly, but I have included a few pictures of the process. What I found was the problem with the going from cast mode to reel mode was there was a spacer that had been worn down so it wasn’t thick enough. Since the spacer was too thin, it made it to where the reel spindle couldn’t catch on the cast-release-mechanism. To fix this, I substituted the old spacer with a flat washer and it just happen to be the right thickness. The other issues were resolved by cleaning and re-lubing with White Lithium Grease.


I was going to clean the outside more, but when as I cleaned it the green paint started coming off. I wanted to keep the green paint, so I just lightly cleaned the outside so it would still look old-ish. I feel like, and I may be wrong, that the reel used to be red. The inside of the reel housing is this really nice red color, and as I cleaned a little I could see some red here and there. I also see quite a bit of red on the drag setting wheel.


I really don’t know much about this reel at all, except for that it says Abu Garcia Sweden on one side. So if anyone has any info on the reel  (model name or number, year they were made, anything really) I would love to know.


Posted in Fishing Tagged abu, apart, cleaner, cleaning, cleanup, dirty, down, face, fish, fisher, fishing, garcia, grease, green, large, lithium, oil, old, open, reel, sweden, take, tear, white

Light Eliminating iPhone Video Rig

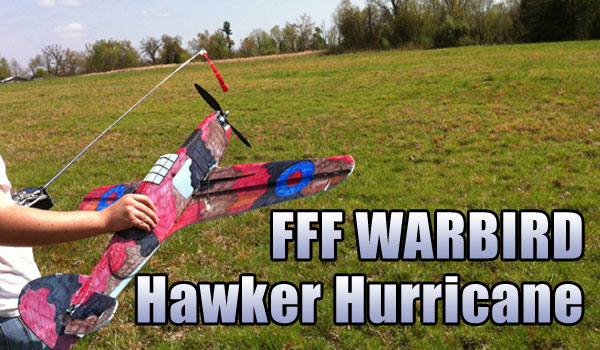
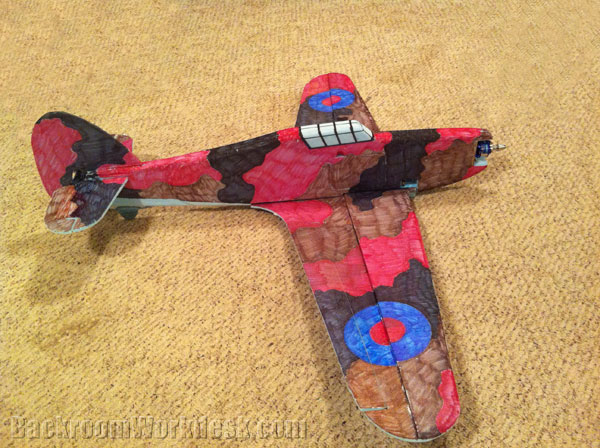
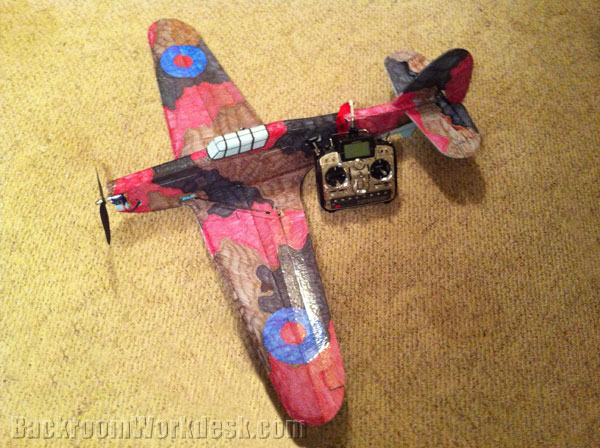
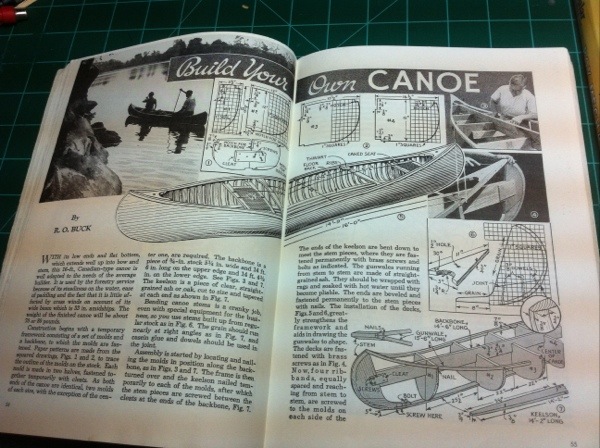
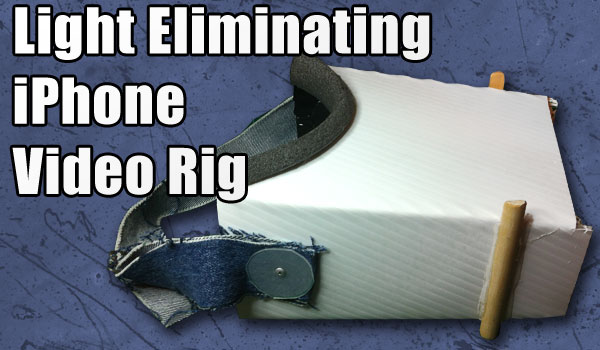
If you watched my YouTube video on my Hawker Hurricane RC plane, then you might have noticed that there were only a few clips of me actually flying after the airplane was fixed. The reason for this is because when my brother was recording me flying, it was hard for him to see the screen on my iPhone due to the the sun. If you have an iPhone, you probably understand that it is very difficult to see the iPhone screen outside on a bright sunny day. Recording a flying airplane with this problem is quite difficult. To fix this, I made a little box that you can use to block out the sun while recording video with an iPhone.


My plan for this light eliminating rig was to have a rectangular-ish box with two open ends. One end will have an iPhone attached, and the other end you will hold up to your eyes to look through. When looking through the rig all you should be able to see is the iPhone screen. Since there will be no light in this box, it will be very easy to see the iPhone screen.


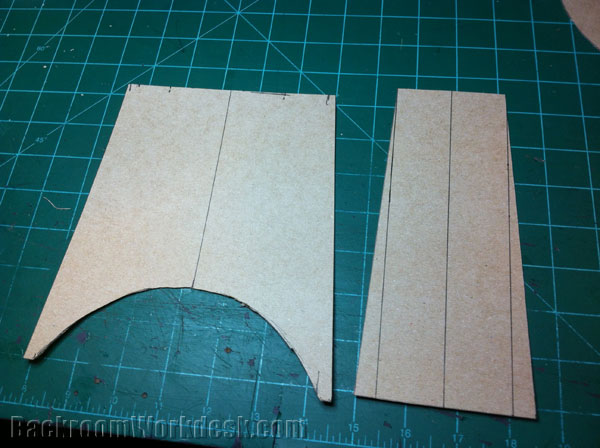
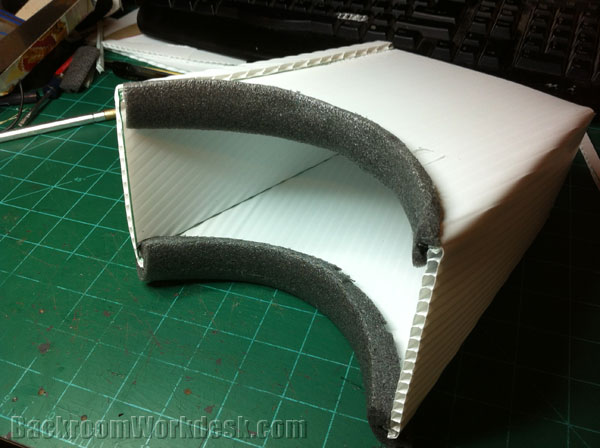
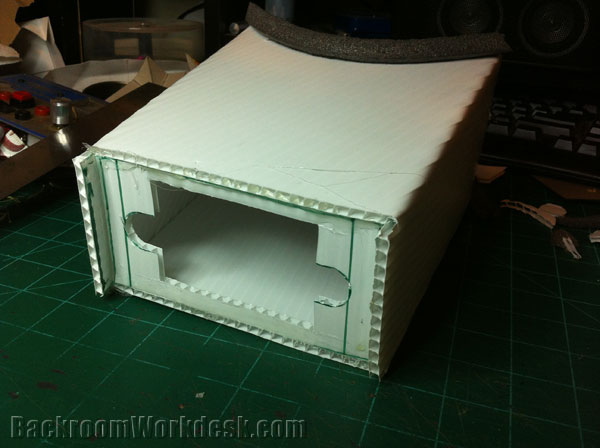
This rig is constructed out of 4mm corrugated plastic (Coroplast). Before cutting the coroplast, I had to know what to cut. Instead of wasting a lot of Coroplast while trying to find exactly what I want, I made some cardboard templates that I tweaked until they were right. I know that I wanted the rig to fit nicely around my eyes, so I knew one end of the rig would have to be rounded. I started by cutting cereal box cardboard into the shape that the top and the bottom of the box will be. One edge of this shape had a concave curve in it that looked like it would fit my forehead/nose-area well. I then held it up to my face, realized where the trouble spots were, and tweaked the template’s curve a little. I repeated this process until I got a curve that fit my face nicely. After I finished the template for the top/bottom of the rig, I made a template for the side of the rig. The side template had nothing special about it. I just used the width dimensions of my iPhone and the dimension from just below my nose to the middle of my forehead. I used these two measurements to create a trapezoidal shape for the side pieces. The length of the rig was determined by how close I could have my iPhone to my face and still focus on it well.


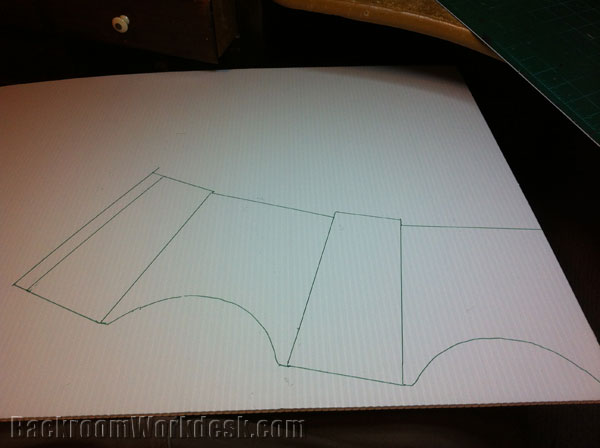
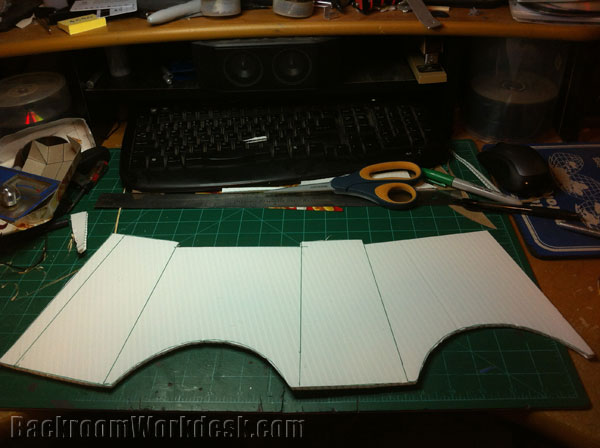
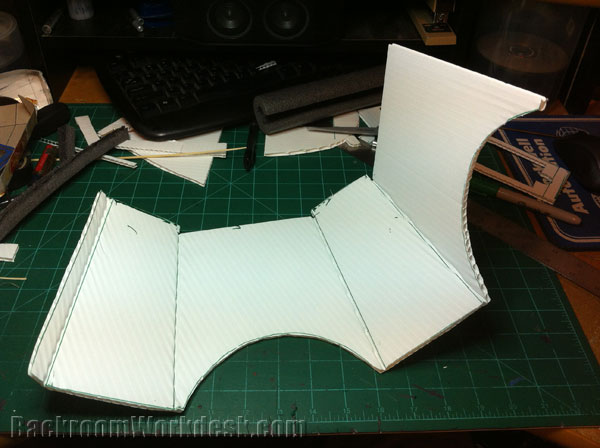
After I had two cardboard templates prepared (one for the top/bottom and one for the sides), I began tracing them onto the Coroplast. After the last template was drawn, I drew an extra ‘piece’ that will act as a tab that will help join the box together. After I had the plan traced onto the Coroplast I cut along the perimeter. After the piece was cut out, I began folding the coroplast along the lines where the templates started/ended. When the piece of corplast had all the appropriate bends in it, I used hotglue to affix the  tab to the outside of the ‘box’.


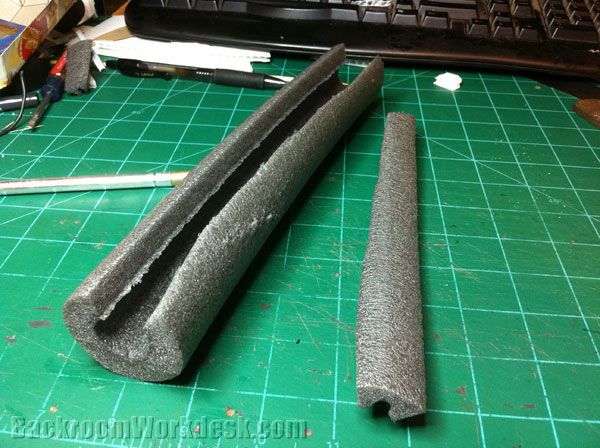
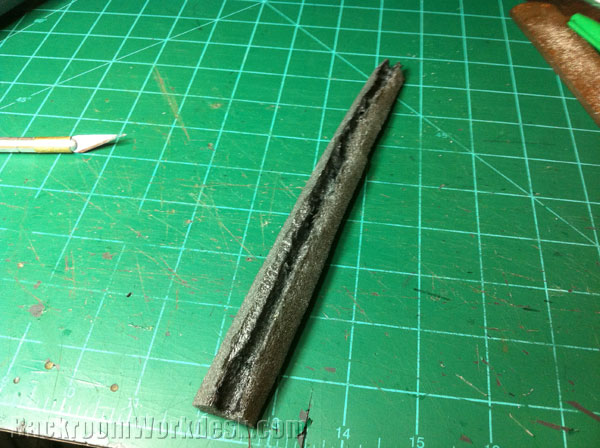
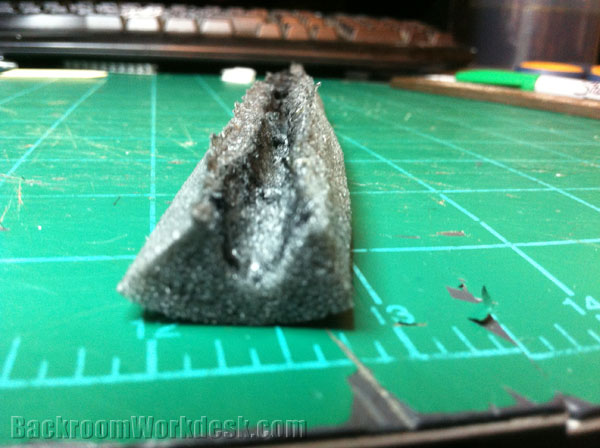
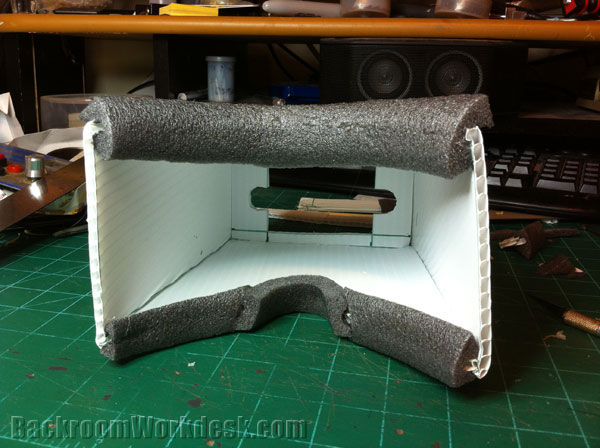
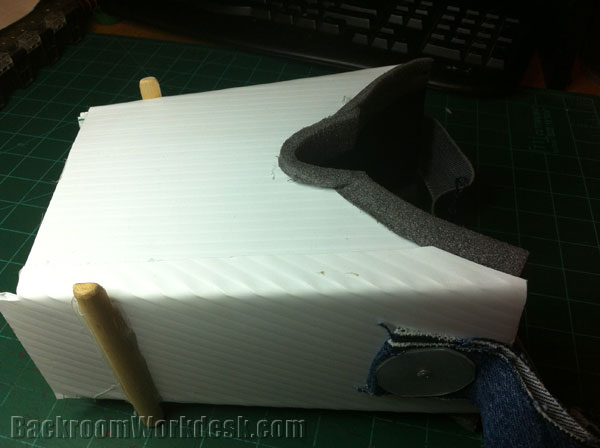
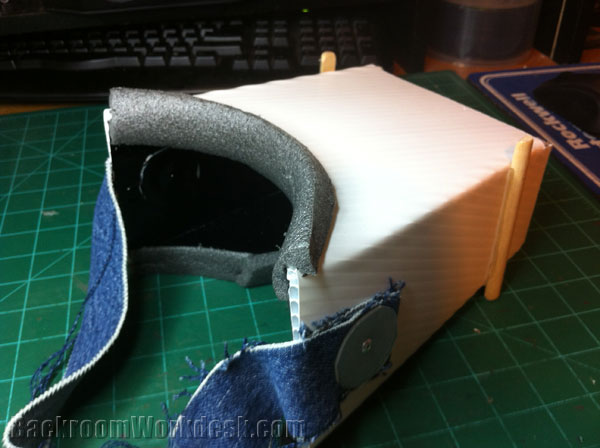
At this point, I put the box against my face to try how it felt….and it felt horrible. The curve fit my face really well, but the edge of the Coroplast hurt! So I added some foam. For the foam, I just cut a piece of PVC pipe insulation (it’s the stuff that you buy in a hardware store that looks like a small, gray pool noodle) and then I ripped it down length ways. When I had the little strip of foam, I used the tip of a hot hotglue gun to melt a groove into the foam for the coroplast to go into. I then hotglued the foam to the curve. I found that I had to put the glue onto the coroplast and then stick the foam on and not put the hotglue onto the foam because the hotglue melted right through the foam!


After the foam was on, I tried it again and it felt amazing this time! When I did this though, I realized a problem: My nose was inside of the box. Now this may not be a problem for some people, but when I tried the box with my iPhone on one end and my face on the other, I found that when I breathed my breath would fog up my glasses. This would make it harder to see than if I never even made this rig, so I cut out a nose hole and padded it with foam.


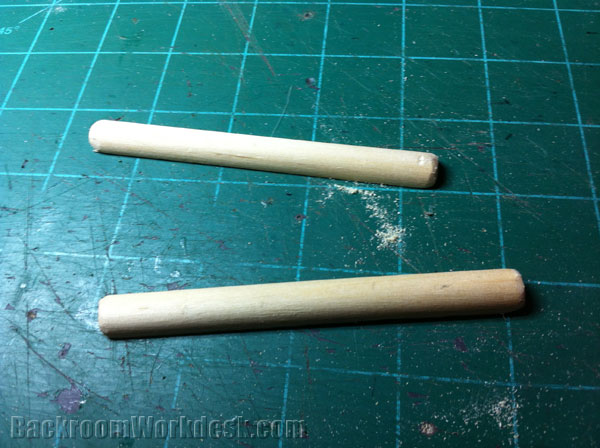
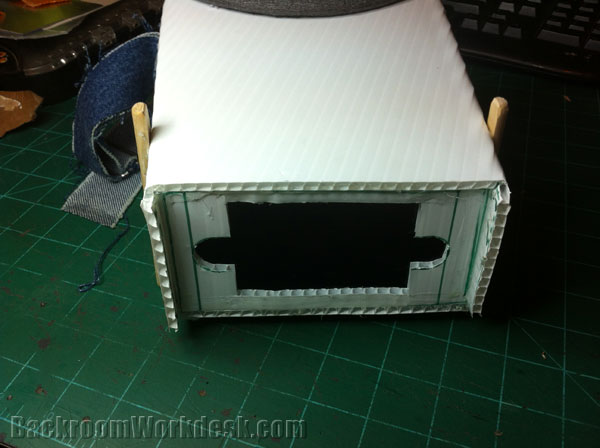
The next thing that I added was a coroplast ‘plate’ to the front of the rig that my iPhone would be up against. The plate had to have a rectangle, the size of the iPhone screen, cut out as well as little grooves so the Home button could be accessed if need be. I then hotglued this plate to the inside of the rig, on the front. Then I added wooden dowel posts to the side of the box near the front. These were for me to attach a rubberband that will hold my iPhone steadily in place.


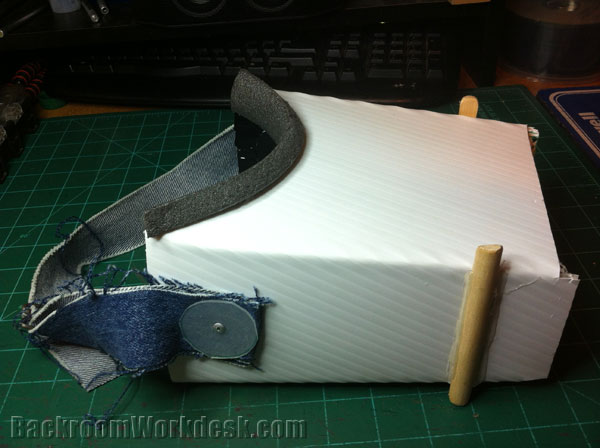
Originally, the rig would’ve been completed at this point, except I thought that it would be really nice if I (or my brother) didn’t have to hold this thing up while recording. So naturally I added a headstrap! haha


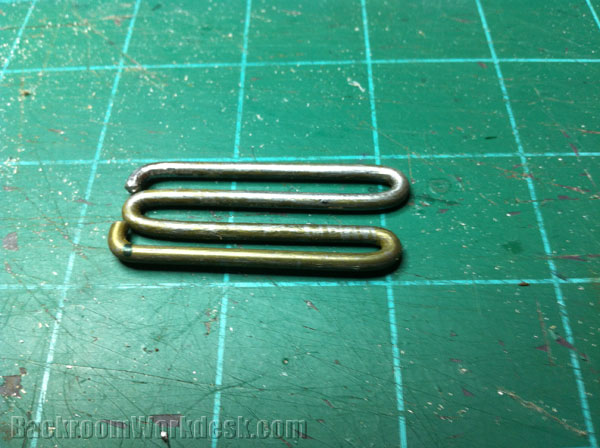
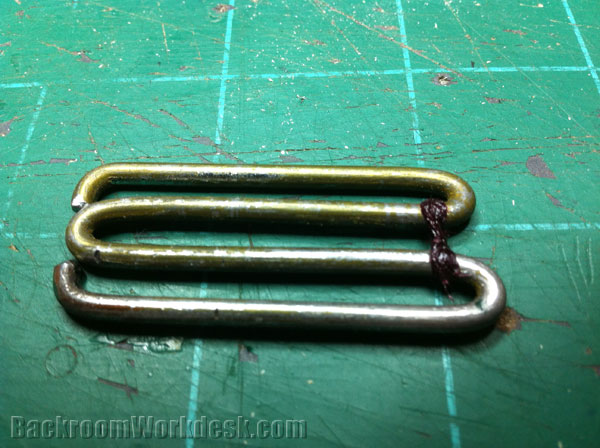
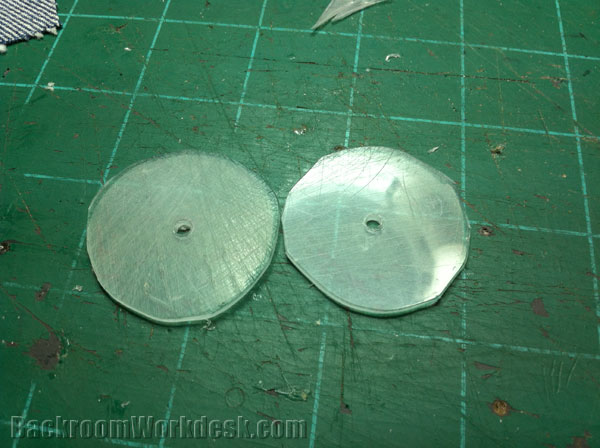
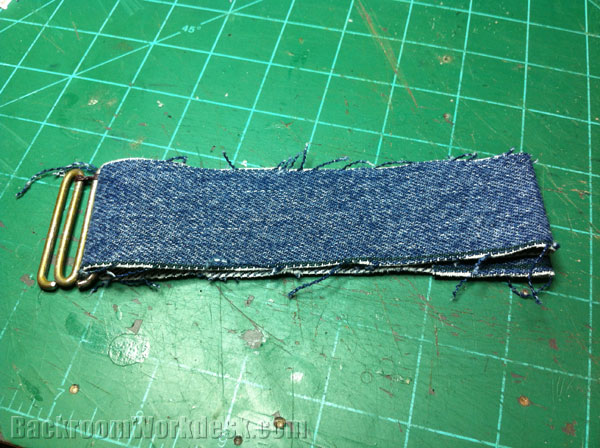
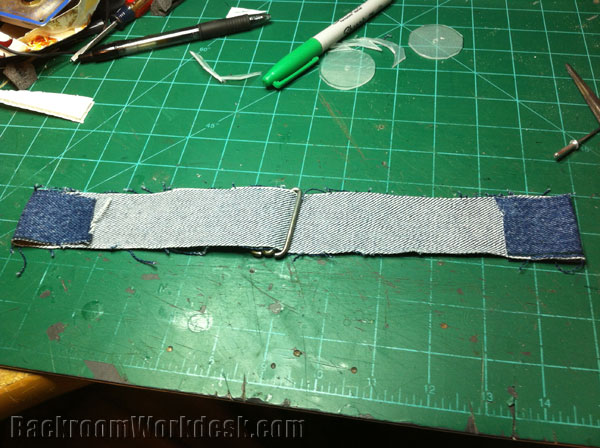
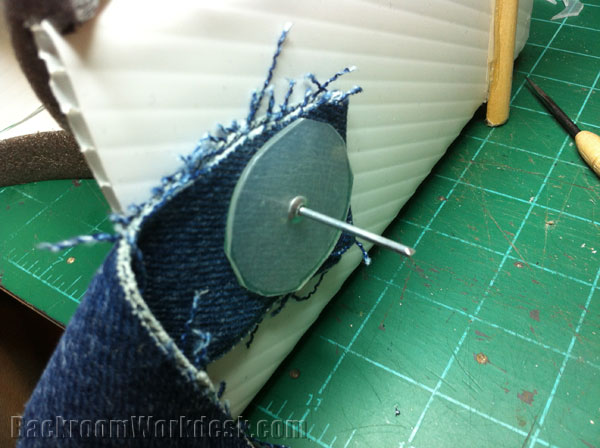
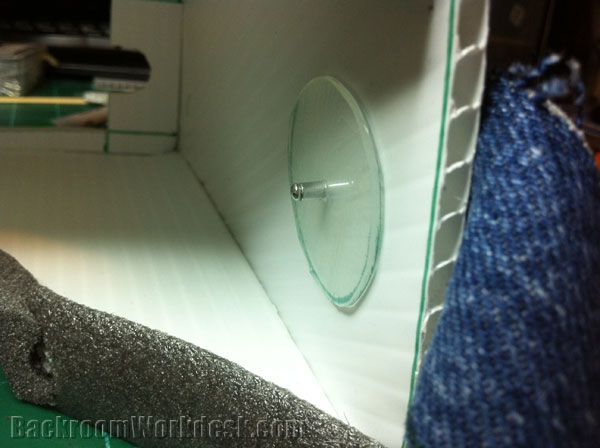
The strap itself is a piece of denim (from an old pair of jeans) cut 1.5″ wide. I then used rivets, and homemade washers, to attach the straps to the box. To tighten the strap, I made a little strap-tightener-thing out of a thick piece of coat hanger wire and a little bit of thread+superglue. I then ran the strap through the tightener-thing and tried ‘er out. It worked. It held the rig to my head while I videoed. I went outside to try it and it worked, but I noticed another problem. The sun could shine right through the white coroplast, so I fixed that.


To fix the sun shining through, I blacked out the inside of the rig. To do this I covered the inside of the rig with black vinyl. This was probably the hardest part of the building process because it was difficult to get the vinyl inside the small box without sticking to itself or the box. If I were to build this box again, I would add the vinyl before the bending step. It would have made it much easier for me and would have resulted in a nicer project. But, after the vinyl was attached, the rig worked great!


So there it is. I found a problem and made a fix for it.


Posted in Video Gear Tagged block, bright, dark, eliminate, eliminating, glar, glare, homemade, iPhone, ipod, light, outside, record, rig, screen, see, sun, video

FFF Warbird – Hawker Hurricane

I haven’t been able to fly my RC planes in a few months due to mainly time restraints, but the other day I decided to build me a warbird and fly it. After looking around on RCGroups and talking to a few people, I decided on building a Hawker Hurricane. The original plans for the airplane had a ~30″ wingspan. My motor is pretty big and I knew it was wayyy to heavy for a little 30″ WS plane, so I scaled the plans up to get a 48″ WS plane. I didn’t really take any build pictures because I guess I forgot, but I’ll tell briefly about the construction of the plane.


The plane is build from 1/4″ FFF (Fan Fold Foam). The fuselage is 6 layers of foam laminated together to get a thick and strong fuselage. The original plan only calls for 4 layers, but because I was making it bigger, I added an extra layer on each side of the fuse. The fuse is pretty cool because with the laminations there are little ‘tunnels’ in the fuselage for routing wires and stuff. This makes the plane pretty streamlined and all the electronics are pretty much out of sight. The wing is a Kfm2 wing. I decided to add a degree or two of dihedral to the wing for better stability. I did this by bending a brass tube and attaching two pieces of carbon fibre tube to it for the wing spars. This later failed on me (watch video) so I wouldn’t recommend using a brass tube. Maybe a thick piece of music wire instead.  I did all the camouflage with sharpie. I added the red color for better visibility in the air.  For the power system I am using an Exceed RC 1050Kv Brushless outrunner, a 1300mah 3s Lipo, a 30A ESC, and a 1147 prop.


After fixing the wing problem (watch video) I really enjoyed flying this airplane. It handles the wind very nicely and with the power setup I can go vertical so I have plenty of power to pull up out of tough situations.  When I flew in the video the wind was blowing around 18-20mph (according to the Weather Channel).


Here is the link to the original plans for the airplane:

http://www.rcgroups.com/forums/showpost.php?p=15415662&postcount=701

Here is the link to the thread where I found the plans. There are like 30 other airplanes similar to this one:

http://www.rcgroups.com/forums/showthread.php?t=1012551


Posted in Airplanes Tagged airplane, Fan, FFF, fly, foam, Fold, Hawker, homemade, Hurricane, plane, RC, scratchbuild, scratchbuilt

1 Year!!!!!

One year ago today, April 17th, I posted my first project here on BackroomWorkdesk.com ! I can’t believe that it has already been a full year!!!

I thought I’d give just a few statistics about the past year…..

– In one year there has been 52 different blog posts

– The site has had just under 10,000 views

– There has been 7 YouTube videos uploaded

– The three most popular posts (in order) are: Alcohol Torch, Homemade RC Boat: Part 3, and Tip: Thread and Superglue

;

I want to say thanks to everyone that checks out the website and reads my posts……..So, Thank You!

;

I have a lot of really cool projects coming up soon. Most of them are already in the works and some are still on the drawing board. Just to give you an idea of what I have planned, here are some ‘hints’….

– As you know I will be building a boat this summer so that is going to happen

– I have been building my own ‘gun’ and it shouldn’t be too, too long before it is completed

– I plan on trying to build an engine of sorts

– I will show ya’ll a ‘thing’ I made that can launch ‘suff’ real far

And a lot of other things as well, so stay tuned! One of the best ways to see things that are ‘in the works’ are by liking my Facebook Page. I normally will post a picture of something I plan to do, or am in the middle of. So check that out.

;

;

Also, I know I didn’t post a project yesterday…..The YouTube video for it is currently uploading and hopefully I will be able to post that project before the day ends…….

;

;

Thanks again!

Posted in Uncategorized

Mousetrap Remote Igniter

About four, maybe five, years ago I thought up the idea of using a mousetrap as the main part of a remote ignition system for lighting ‘experimental’ fireworks and such. The idea was to attach a match to the mouse trap’s lever and have a matchbox striker pad suspended above. When the mousetrap was triggered the lever will fling closed, which will strike the match on the striker pad, which will light the match, which will light the fireworks fuse. I built one of these when I thought of the idea and used it multiple times successfully. I guess the original one I built has been destroyed or lost because I have no idea where it could be. I thought it’d be fun to build one again and I thought I’d show y’all it. So the other night I built one……..

To start, I cut a piece of brass tubing to about ~2.75″ and attached it to the side of the mouse trap lever using thread and superglue. A match will eventually go into this brass tubing. Then, using screws, I attached the mousetrap to a 1/4″ plywood base. When I attached the mousetrap to the base, I made it that the brass tube was roughly in the center. Then I built a stand that the striker pad will attach to.

The wood stand is made from a piece of wooden dowel screwed to the plywood from the underneath of the base and a piece of wood screwed into the top of the wood dowel. I measured that with a match in the brass tube, when the mousetrap’s lever is vertical, the height from the top of the ply wood to the top if the match head is 3.25″ so I cut my wooden dowel to 3.375″. The next piece I worked on was the striker pad.

I cut the striker pad off of a large box of matches. To make the striker pad stronger, I put two layers of box tape on the back of the striker pad. Also, I later realized that when the match was lit, it would burn the striker pad so I had to make an adjustment. What I did was I removed just one layer of cardboard from the last inch of the striker pad. I then put some tinfoil there (attached with double sided tape) so the flame couldn’t burn anything. Also down on the end with the tinfoil, I attached, on the back, a short piece of popsicle stick. This is to attach the rubber bands to……

To attach the striker pad to the assembly, I used some foam mounting tape to attach one end to the wooden stand, and on the other end I used rubberbands. To attach the rubber bands, I screwed two woodscrews into the plywood at the front. I then hooked a rubber band to a woodscrew, and then I attached the other end of the band to the Popsicle stick on the end of the striker pad. I did this same process for the other rubberband. The rubber bands provide some resistance to the match head and springiness so it isn’t too rough.


At this point, the remote igniter assembly works fine, but I made a few adjustments anyway. I didn’t like using the original mousetrap’s latch, so I made a new one. I took off the latch arm and  screwed in an eye-screw on either side of the lever (when it is pulled back). Then to latch the rig, I pull back on the mousetrap lever, and stick the latch arm through an eye-screw, over the lever, and through the other eye-screw  To trigger the igniter, I just yank on the pin real fast. The other thing I added was a aligator clip where the match lands. This clip is to hold the fuse of whatever I am trying to light.


Now, I really enjoyed building this and it is fun to play with, but it is not the most practical. It doesn’t really work outside in the wind, it doesn’t light all the time, and I’ve had problems with matches breaking. So, I encourage you to build one for fun, but I wouldn’t recommend this to put on a fireworks show 😛


Posted in Uncategorized Tagged E-match, electronic, fire, fireworks, flame, Igniter, light, match, mouse, mousetra, mousetrap, remote, trap

Really Cool Books

I always enjoy seeing other people’s ideas and projects. Even if it’s something I may never build myself, I like to see how other people do things because it gives me ideas and sometimes I will learn a new way of doing something. One of my favorite things to read are the Boy Mechanic books.

My two favorite Boy Mechanic books are The Boy Mechanic: Best Projects from the Classic Series and The Boy Mechanic: 200 Classic Things to Build. These books are filled with many different projects. There are so many projects in these books that I would love to do one of these days when I have the time and money. For example, one of the projects in the “Best projects from the Classic Series” book is “Build Your Own Canoe”. It gives plans and steps on how to build your own canoe. That project is for sure on my To-Do list, it just may be a while before it happens. Haha. Some of my other favorite projects from that book tell you how to make a blow gun that has a breech loader for rapid fire, plans to machine your own model internal combustion engine, and how to carve your own bow and arrows.

The other book is also filled with awesome projects. It has plans to build a real glider that you can use to glide down a large hill, a really simple, yet effective, lock mechanism, and a hand held mechanical fan. What I love about both of the books is that aside from some of the main projects, they are filled with little tips and tricks and ideas. Normally at the bottom corner of a page there is just a small picture and a short description of a really good idea/tip/trick.

I normally try to go through these books about every few months because they are so interesting. I’d highly recommend that you buy them for yourself just because of all the great projects in them. 20130401-235141.jpg20130401-235232.jpg20130401-235241.jpg20130401-235301.jpg20130401-235310.jpg20130401-235320.jpg

Posted in Miscellaneous

Alcohol Torch


I was talking to one of my friends the other day and she was telling me about this torch she has. She said it was fueled with denatured alcohol and you just squeeze the bottle to make it work. I googled the torch later in the week and watched a YouTube video of one in use and it seemed like something I could really use and it also seemed easy to make. I had all the materials on hand so I took an hour or so and built an Alcohol Torch.

For the bottle, I am using a bottle that I bought at Harbor Freight. The bottle came in a 3-pack. I had an Elmer’s Wood glue applicator tip laying on my desk at the time and I realized it just happen to fit the Harbor Freight bottle I had so I was like “Yup, this is what I’m using”. I pulled the applicator tip apart and cut it down until I just had a round hole. I then cut a thin piece of aluminium (maybe 1/32″) and bent it into a rough tube shape. I then pushed this tube into the soon-to-be torch cap’s hole. I then heated up the metal tube a little so that it would melt the plastic of the cap a little. When this happened I then let the plastic cool around the metal. This gave me a decent seal so that later on alcohol fumes won’t be coming up around the tube. I then shoved my oil lamp wick through this metal tube in the cap.

I then began working on the tube that the alcohol fumes will be forced through. For this tube I am just using an 1/8″ diameter brass tube. I bent the tube into a rough S-shape. I then drill a small hole in the cap and stuck the brass tube through it. At this point I cut the brass tube to length. I left a little brass tube sticking into the bottle so I can raise and lower the fume tube later on.

At this point the construction of the alcohol torch is complete. I just screwed on the cap, waited for the wick to soak up the alcohol, and then tested it out. The way to work the torch is you light the wick that has soaked up the denatured alcohol and let it remain lit. When you’re ready for the torch, you squeeze the plastic bottle which will force alcohol fumes through the brass tube. It worked pretty good the first time, but I had to play around with the fume tube’s height a little to get the optimum torch flame. Once I found a good spot for the fume tube, I got a really nice flame. Once thing I learned is that it is much better to do long, constant speed squeezes to get the fumes out versus powerful and fast squeezes.


Posted in Fire/Pyrotechnics, Tools Tagged alcohol, back, backroom, build, denatured, diy, fire, flame, heat, home, homemade, how, made, make, to, torch, work, workdesk

Fishing Reel Lubrication

If you read my previous post you know that we went fishing the other day. Well last time we went fishing, back in the fall, I noticed there was a problem with my fishing reel. When I tried to cast it wouldn’t spin smoothly and there was a lot of friction. I knew that my reel would need to be disassembled  cleaned, re-lubed, and put back together. When I heard that we would be going fishing the other day, I went and got my reel out of the boat to get ‘er fixed up for casting.


After getting my Abu Garcia Silver Max reel inside, I laid out a towel for dissasembly. I like to work on a nice folded white towel when dismantling something like a fishing reel. The thickness and friction of a towel keeps small parts from rolling around and it also makes it much easier to see small parts against a white background. To dismantle the fishing reel I started by taking apart the crank assembly and laying it out carefully. Before I could get into the innards of the reel, I had to grab the side of the reel that does not have the crank and rotate it downwards about 15 degrees. This side then pulls off and exposes a hidden screw that removes the crank side of the reel.


After exposing the inner workings of the reel, I began cleaning off the old grease residue. The old gunky grease had a green-ish color. It was apparent that there wasn’t too much grease in the reel. Most of the moving parts didn’t even have grease on them anymore which isn’t good at all. Using denatured alcohol I cleaned off what remained of the old grease. I cleaned the gears, bearings on both sides of the reel, the shaft that the fishing line guide rides on, and everything else with the alcohol. When everything was rid of its old lubricant I began adding fresh lube.


I applied thin viscosity oil to all the bearings so it would get down in them real nice and I also applied the oil to the fishing line guide shaft gear. I then used white lithium grease on pretty much all other moving parts of the inside of the reel. I was careful to not over grease it, but still have a good amount. If you look at the picture you will see that there are just a few dabs of grease on the main gear. This is because it will all spread around once I start turning the crank after reassembly.  And after re-lubing, I reassembled the reel.


I used the reel fishing Friday and it was great! I couldn’t believe how much smoother it was. When I used it in my bedroom to put on new line I didn’t notice a huge difference, but I could tell a great difference out on the lake when I cast. I could cast quite a ways farther than I had been able to the last few times I had been fishing!


Posted in Fishing Tagged abu, assemble, clean, diagram, dissasemble, fish, fishing, garcia, lube, lubrication, Max, silver

Gonna Build a Boat

First off, I know this post is delayed. I was sick earlier this week and completely forgot about writing a post due to the sickness. Anyway . . . . . . .


For the past few years I’ve talked about building a boat. More specifically I’ve talked about building a small, easy to transport, boat. Something like a kayak or a canoe. Well Friday afternoon my family and I went to the lake to fish off the bank. The place we went to was a little bay right off of the main lake. As I was sitting there fishing I thought about building a boat again. I thought it would have been awesome to have just a small boat that I could paddle out maybe like 100 feet and fish. With that being said, my plan is to have some type of aquatic transit vehicle by the end of the summer. It doesn’t have to be super fancy, just something that I built myself and gets the job done.


When we go fishing off the bank we normally pack a lot of things: Soda cooler, minnow buckets, tackle box/es, fishing poles, cooler for fish, chairs, . . . . with all these items in the truck, space is at a premium so if when I build a boat it will need to be space conservative. I have done some research and found some really cool commercial folding kayaks, but they start out at over $1000. I think it would be really neat to have one of them, but like I said, I kinda want to build it myself. A few options I am looking at right now are 1 sheet boats. This is a boat that is constructed out of just 1 sheet of plywood. The reason I am looking at these are because not only are they small-ish, they are cheap to build. The major factor in building this boat will be cash. It may take me a while to acquire the materials to build a boat due to the cost. That is why I need to find a cheap plan.


Just about an hour or two ago I stumbled across this really cool kayak made out of coroplast. Yes, coroplast. The same stuff that political signs are made out of. This particular kayak is made out of a 4×8′ sheet of the stuff and it holds up to a rectangle for storage. If I can find the plans I will most likely build this. It’s pretty much exactly what I’m looking for!  Here is the designer’s YouTube video of his coroplast kayak…..


Posted in Uncategorized 2 Comments

A work in progress……

Although I’ve been really busy this week, I still got quite a bit done on a current project of mine. The only problem is it isn’t finished yet so I’m not going to show the whole thing. Since the project I worked on is a big one, I kinda want to reveal it all at once. So what I’ll do is just leave you with a picture of a bracket/latch I fashioned out of some aluminium…

20130304-231630.jpg

Posted in Uncategorized
  • « Older Entries
  • 1
  • 2
  • 3
  • …
  • 6

Proudly powered by WordPress | WordPress Theme Custom Community 2 developed by ThemeKraft